My improv piecing comes with a plan, and often a set of rules that I'm following for construction. As I work, I choose whether to follow or break my rules. Today I'm sharing my process for creating improv triangles on the corners. Along the way, I'll point out times for you to make design decisions to tailor your project to your own preferences. As always, I'd love to see what you create from the tutorial.
Welcome! I'm pleased to be joining in on the Back to School Blog Hop with Sam Hunter of Hunter's Design Studio.

Since I was working to stitch up a small sample for the tutorial I raided my scrap pile. I opted for blues, so I poured out the blue scraps to find the right sizes and values from the pile. Scraps are great for a small project, but for a larger project consider working with a pile of fat quarters or even yardage. Scraps can always be utilized for the triangles.

I decided that I would focus on the lightest value blues for the background, and my darkest navy fabrics (which was narrowed down to white on navy prints) for the triangles.
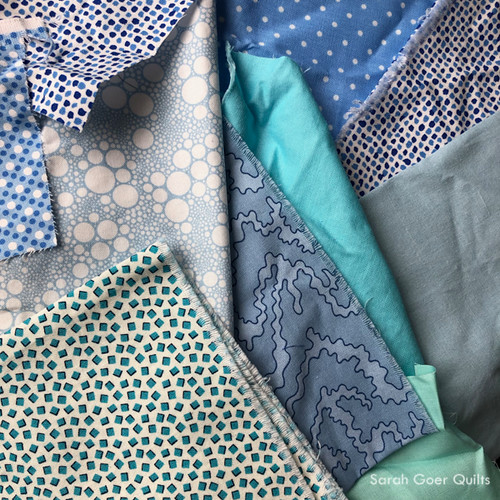

I chose two of my lightest blues that shared a similar hue of blue. The size of these scraps drove the size of my background squares. I rough cut mine into approximately equal sized squares. Obviously the background squares could be larger or smaller. You could work with a variety of sizes in one project (i.e. 3", 6" and 12"). Or you could use rectangles instead of squares.


For sewing on a triangle corner I did not precut my triangle fabric. If I had a straight edge on my scrap I used that edge. If there wasn't a straight edge, I trimmed the fabric to create one. I placed fabrics right sides together to create a triangle of background fabric showing. (This will be trimmed off in a future step.) I made sure to vary the angles of my triangle seams. Part of the beauty of improv is the organic or non-precise nature of the piecing. I gave a little thought to fabric pairings, using each navy print on both background fabrics. The triangles could be scrappy like mine, all a single fabric, or chosen to create a pattern across the quilt.

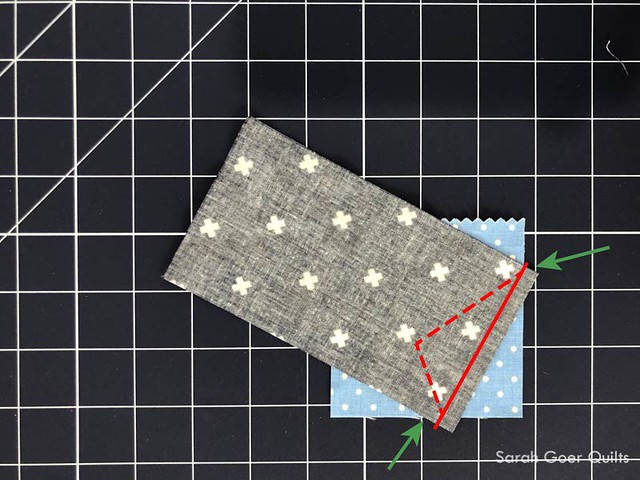
The green arrows in the photo below indicate the point where the fabrics overlap. You want to make sure that there is at least 1/4" of the triangle (top) fabric past the edge of the background square. The solid red line shows the 1/4" sewing line. Check that there is enough fabric mirror image of the corner over the stitching line, marked by the red dotted line here. You may find it helpful to hold or pin on the stitching line and fold over the top fabric to make sure it fully covers the corner of the background square.
Once the seam was sewn, I trimmed 1/4" from my stitching to reduce bulk. This can be done before or after you press the seam and trim the top fabric.

If you trim the background first, as I did, then you can trim the triangle fabric by aligning the acrylic ruler with the two edges of the background fabric.

If you trim the triangle fabric first, you can trim with the back fabric on top, as shown below. In this case you trim the triangle fabric right at the edges of the background square. 
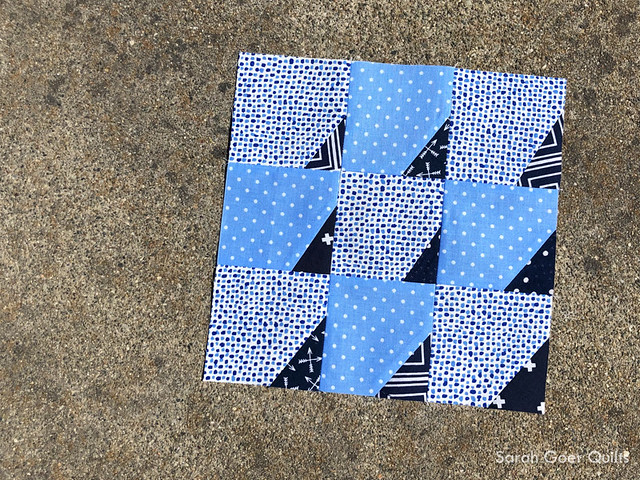
Here's my first block!

Generally with improv piecing, I repeat the process until I feel done. Feeling done can mean a number of things for me. Perhaps I'm no longer enjoying the process, I've built to a specific size, or I ran out of a key fabric I was using (though in improv, it can be very forgiving to sub in another fabric when I run out of something). In this case I stopped with nine blocks.

Once the units are created you can decide whether you want to trim them down or build them up to all be the same size. Another option would be to piece them without making them the same size first. I looked to see what the largest square I could trim to would be. If you trim them to be identical size, then the next step of completing the quilt top is a matter of combining the blocks in each row or column and then piecing those strips to finish the quilt top. If you choose to work with units that are not identical in size, then it may be helpful to work on a design wall to arrange the units in a way that they can be pieced together in larger sections to complete the quilt top. You may also find having extra background fabric(s) to add in to be helpful with this piecing technique.
My unfinished squares were trimmed down to 3 1/4".


Another variation is to stitch and flip onto the corner twice to create a double triangles, like these blocks from another project.

You can see a variety of different layout options in this post.
Have you tried improv? What is your favorite technique for improv piecing?
I enjoy teaching Planned Improv Piecing technique-based workshops and my favorite lecture to present is Rules and Options of Planned Improv Piecing.
Thanks for visiting my stop on the Back to School Blog Hop. Be sure to visit the other participants.

Day 1 – September 1 – Sam Hunter: Sewing Long Seams Without Stretching – huntersdesignstudio.com
Day 2 – September 2 – Susan Arnold – Joining Binding the Easy Way – quiltfabrication.com
Day 3 – September 3 – Angie Wilson – Fussy cutting tips and techniques – www.gnomeangel.com
Day 4 – September 4 – Andi Stanfield – No-Mark HST: Let your machine be your guide – truebluequilts.com
Day 5 – September 5 – Bobbie Gentili – Say YES to Y-seams – geekybobbin.com
Day 6 – September 6 – Mel Beach – 5 Reasons to Say Woo Hoo! to School Glue – pieceloveandhappiness.blogspot.com
Day 7 – September 7 – Laura Piland – 7 Ways to Use a Laser on Your Sewing Machine – www.sliceofpiquilts.com
Day 8 – September 8 – Suzy Webster – How to solve loops in free motion quilting – www.websterquilt.com
Day 9 – September 9 – Tara Miller – Accurate Stitch-and-Flip Corners – quiltdistrict.com
Day 10 – September 10 – Latifah Saafir – Accurate Seams Using Masking Tape! – latifahsaafirstudios.com
Day 11 – September 11 – Sarah Ruiz – The Magic of Glue Basting – saroy.net
Day 12 – September 12 – Jen Shaffer – Ways to stop your ruler from slipping while cutting – patternsbyjen.blogspot.com
Day 13 – September 13 – Cheryl Sleboda – Basics of ruching (a vintage fabric manipulation technique) – muppin.com
Day 14 – September 14 – Raylee Bielenberg – Choosing quilting designs for your quilt – www.sunflowerstitcheries.com
Day 15 – September 15 – Jen Strauser – Accurate and Attractive Machine binding – dizzyquilter.com
Day 16 – September 16 – Jane Davidson – Matching points for all types of intersections – quiltjane.com
Day 17 – September 17 – Teresa Coates – Starch and starch alternatives – teresacoates.com
Day 18 – September 18 – Jen Frost – Benefits of spray basting – faithandfabricdesign.com
Day 19 – September 19 – Sandra Starley – Getting started with Hand Quilting – utahquiltappraiser.blogspot.com
Day 20 – September 20 – Karen Platt – Drunkard’s Path Made Easy – karenplatt.co.uk/
Day 21 – September 21 – Kris Driessen – All Kinds of Square (in a Square) – scrapdash.com
Day 22 – September 22 – Sarah Goer – Planned Improv Piecing – sarahgoerquilts.com
Day 23 – September 23 – Kathy Bruckman – Organizing kits for on-the-go sewing – kathyskwiltsandmore.blogspot.com
Day 24 – September 24 – Cheryl Daines Brown – The Secret to Flat Quilt Tops: Borders – quilterchic.com
Day 25 – September 25 – Cherry Guidry – Pre-assembling fusible applique – cherryblossomsquilting.com
Day 26 – September 26 – Laura Chaney – Getting started with English Paper Piecing – prairiesewnstudios.com
Day 27 – September 27 – Ebony Love – Cutting Bias Strips from a Rectangle – lovebugstudios.com
Day 28 – September 28 – Tammy Silvers – Working with heavier weight threads in your machine – tamarinis.typepad.com
Day 29 – September 29 – Kathy Nutley – Create a perfect facing or frame with 90 degree angles – quiltingsbykathy.com
Day 30 – September 30 – Joanne Harris – Using Leaders and Enders – quiltsbyjoanne.blogspot.com


