Tag Archives: planned improv

16 Comments

The fabrics featured in this post were given to me by Island Batik.

Last month I created Emerald Swallowtail, a baby quilt designed with inspiration from a vintage quilt design. The creation of that quilt resulted in 30 leftover HSTs from the offcuts of my snowball corners. Step 4 of this tutorial shows how I like to sew a second line of stitching before cutting off extra triangles. I prefer to have leftover HSTs instead of just a pile of loose triangles that I'd have to sew bias edges together later to use. I have a bin where I keep orphan bits and blocks that these usually go into. I've used them previously to make mini quilts and small bags. My emerald HSTs didn't even make it into the bin though. I kept them out to use for this months Playful Pillow!

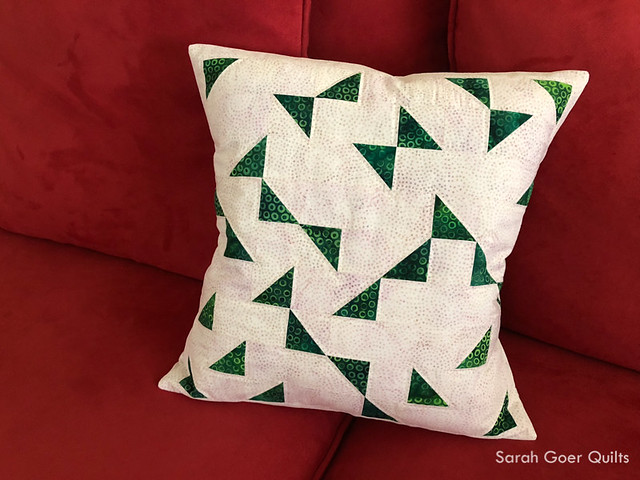
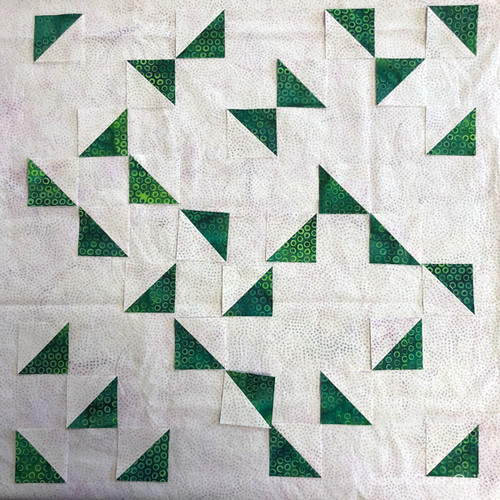
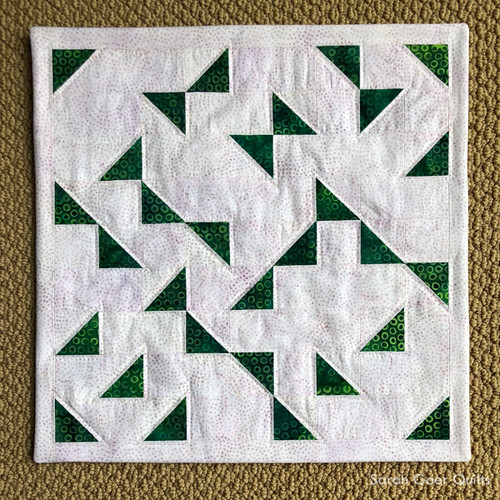
I decided I wanted to make something with the same limited palette as Emerald Swallowtail. I had used all of the green for the quilt (Bubble Hole in Leaf), but I did have yardage left of my neutral (Almond). Designing without a pattern I used a Planned Improv technique to limit myself to the HSTs and Almond yardage for the pillow. I designed on a grid, and decided that triangles could only touch on a point, not on a side. Here's the final plan.

My HSTs were trimmed to 2" x 2". Once they were pieced with filler pieces cut from the background yardage I had a 14" x 14" (unfinished) panel. I added borders to each side, intending to trim down after quilting.

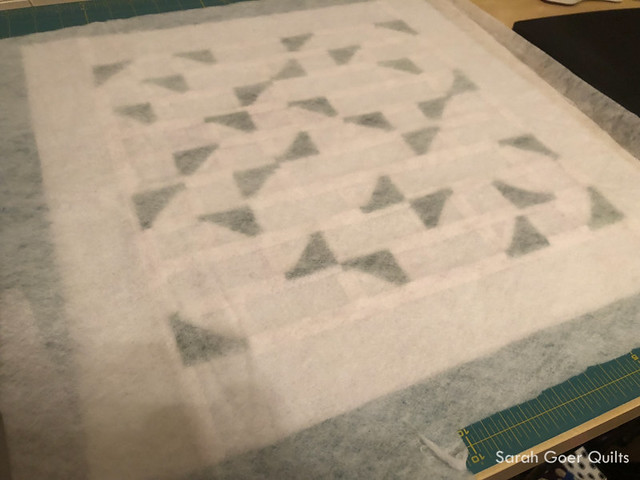
I opted for Hobbs polyester Thermore batting. It is ultra-thin (1/16" loft) and I figured it would be nice for the pillow cover to not get crinkly in the wash. Here's a peak of the Thermore batting layered over my quilt top.

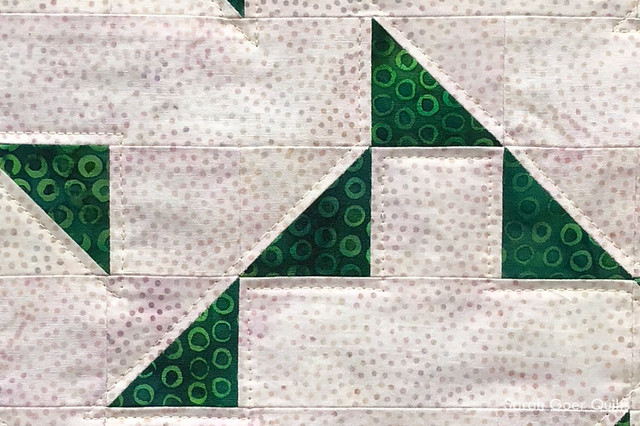
I added a backing layer of fabric for my quilt top before adding some walking foot quilting. I opted to echo each group of triangles approximately 1/8" off the perimeter using 50wt Aurifil #2110, Light Lemon. I'm happy with the look of this. Another option would be to add filler quilting in the background, or to add quilting inside and outside of these echo lines.

My finished pillow cover is 15" x 15".

And here it is with a 16" Poly-fil pillow form. This is the first pillow cover I've made, and I opted for a snug fit. I'm curious how the look would change with a down pillow form.

My back panels have an approximately 7" overlap (more than I think I needed). The back is unquilted fabric, with a hemmed edge. Here's what it looked like while I was in the middle of wrestling the pillow form into the cover. ;-)

How do you like to finish you pillow covers?


Thank you for visiting to see my Island Batik Playful Pillow!

Check out some of the other Playful Pillows created by Island Batik Ambassadors this month:

Connie's Scrappy Batik Pillow

Jessica's Frequency Pillow

Mania's Tuffet

Dione's Fairy Owl Pillow

Karen's Rainbow Trout

Laura's Cactus Pillows


I've linked up to TGIFF, Finish It Friday, and Needle & Thread Thursday.

I've also linked up to 2018 Q2 Finish Along linkup. See my whole Q2 list.

SaveSave

12 Comments

This is my entry in 2018 Pantone Ultra Violet Quilt Challenge, hosted by Rebecca Bryan and Sarah Elizabeth Sharp.

Despite my busy schedule, how could I not participate in the Pantone Quilt Challenge this year? I mean, PURPLE! I even had a dozen Kona purples in my stash from purchasing fabric for my Rainbow Remix project in 2016.

I've been wanting to play with All About Angles variations and I had yet to make one in all Kona. This seemed the perfect time. I sliced up my Kona purples. The colors I used were: Amethyst, Bright Peri, Heliotrope, Hibiscus, Lavender, Lilac, Morning Glory, Mulberry, Orchid, Thistle, Tulip, and Wisteria. One thing I love about this Planned Improv technique is how quickly it goes together. With no specific measurement, it's mostly about about pairing up interesting color combinations and I found that working with a pile of purples, all of the combinations were interesting to me!

I built a bunch of chunks and moved to the design wall to work my final layout. This stage is so fun for me, because there are many possible options. I considered sewing them together in this orientation (minus that bonus chunk on the left), but opted for a different design.

I pieced 12 of my chunks together into this mini quilt top. Then I opened the link up page for the challenge and realized that the "Just the Top" requires a minimum of 30" on a side. At this point my quilt top was about 24" square. Oops. No big deal, I decided to add some black borders on the top and bottom. That brought it up to about 24" x 32" and I went on with my day this afternoon.

After school I once again sat down to blog and link up my project. This was when I realized that the requirement for the category was 30" was that the shortest side needs to measure 30". This meant that my project was still too small. No big deal, right? Add a couple more borders! Except that I was across town from my sewing machine and my quilt top.

One quick trip to visit my sewing machine and two more borders have been added, bringing it to approximately 33" x 33". (Photographed in night lighting.) I'm looking forward to adding some graffiti quilting to it.

Every time I piece another All About Angles I have new ideas of variations I can try. This time I made a list with a bunch of options for next time. But before it comes to that I think I'll finish my three in progress versions.

I'm linking up to the 2018 Pantone Quilt Challenge, in the "Just the Top" category. Hop on over to check out all the purple, quilty goodness and vote for your one favorite in each category. Congratulations to everyone who participated. There is a beautiful pile of purple work!

Update: You can see my finished quilt in this post.

SaveSave

SaveSave

SaveSave

SaveSave

9 Comments

In April I had the honor of presenting at two Meet the Teachers events in California. First, I attended the Northern California Quilt Council event about an hour from my house. Later that week I flew down to Long Beach to attend the event hosted by Southern California Council of Quilt Guilds. The general idea of these two events is similar, though the Southern California event is larger scale. In both cases, the participating teachers have a booth or table space to display their workshop offerings and promotional materials. Each teacher is allowed three minutes on stage to give a short spiel on their workshop and lecture offerings and there is time for guild representatives to circle the room and speak one-on-one with the teachers.

I attended NCQC Meet the Teachers in 2017 as an observer with my guild program chairs. It was helpful for me to have an idea of how the event is run so I would know what to expect. That information, together with insight from my friend Mel, was very helpful in preparing for attending as a participant this year. Some teachers had a much more elaborate setup than I did, but I had all the necessary items covered. I brought sample quilts, postcards that included photos of my workshop offerings, and a signup sheet for my newsletter. The one thing I'd definitely add next time is a quilt stand for hanging a quilt behind me at my table.

On stage the volunteers hold up each teacher's class sample quilts while the teacher gives their spiel. (Quilt holders are the best!) I shared about my two Planned Improv workshops, Scrappy Squares and All About Angles, as well as my three lecture offerings.

At my table I had a few more samples for people to see. And I gave the 30-second version of my spiel to the guild representatives who came by the table.

For the Southern California event, I traveled with my friend Mel Beach. (Thanks to her for snapping a few pictures of me!) You can read more about the fun we had in her recap of the events.

A great big thank you to all the NCQC and SCCQG volunteers for hosting Meet the Teachers! It's such a great opportunity and both events ran so smoothly. Also, thank you to all of the guild representatives (some of whom traveled quite a distance) for attending the event, and for stopping by my table to chat.

I'm curious. For those of you who live outside of California, are there organizations hosting events like these in your area?

SaveSave

SaveSave