Tag Archives: finished quilt

20 Comments

Over the winter break, my son and I worked to finish his fourth and largest quilt. He began work on it this past summer and it was quilted in November. My final finish of 2017 was to help him finish it up on New Year's Eve.

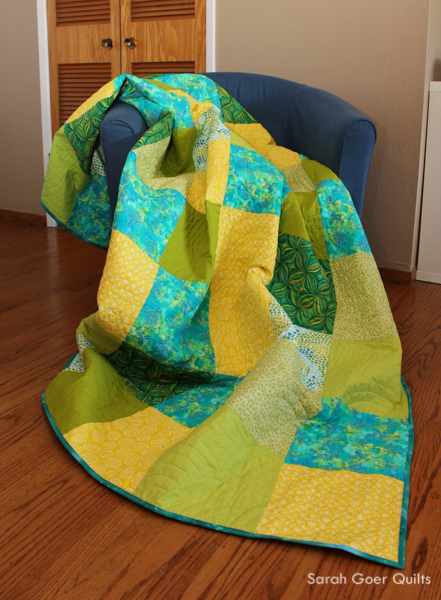
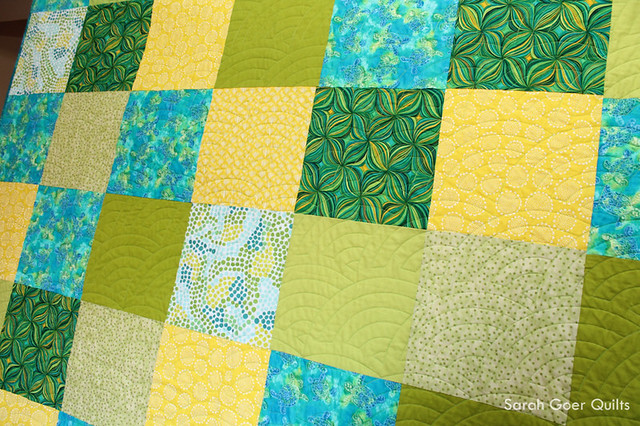
G designed the quilt to be a twin-sized bed quilt for his sister. All of his fabrics were chosen by him from my stash. I think we all especially love the teal turtle fabric. I love his combination of colors and fabrics, especially the addition of that bold green and yellow print. He made the design decision for that print and the turtle print to not ever be right next to each other.

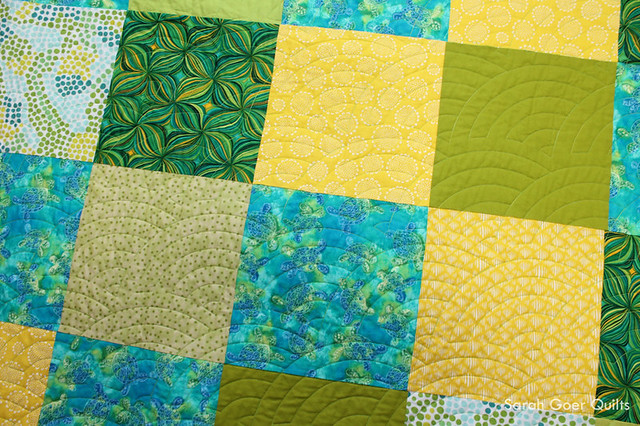
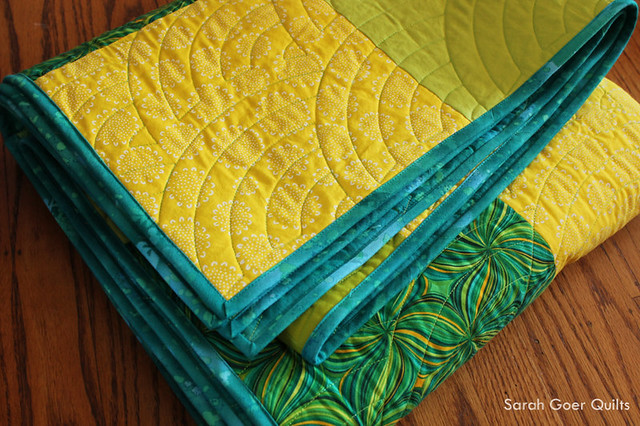
We sent it out to a local long arm quilter (Tami Levin). G chose the Baptist Fan quilting motif. I really like the curved quilting. It adds a great dimension to the quilt. The lines of stitching are about an inch apart.

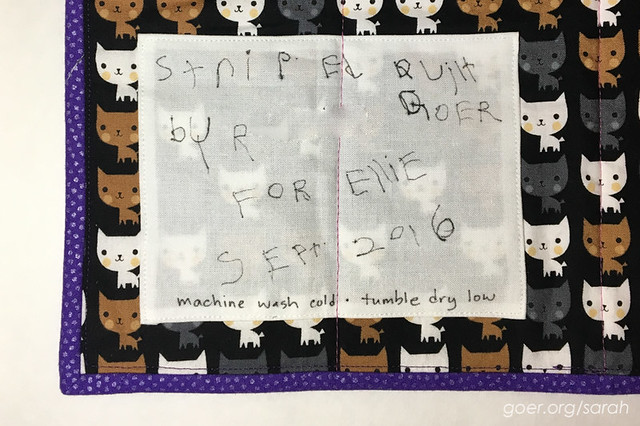
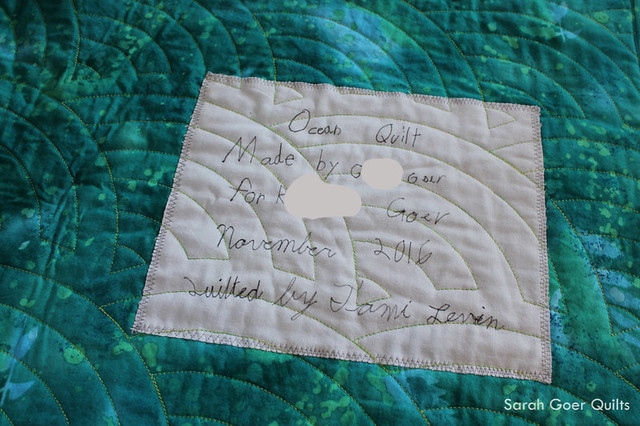
One of my favorite features of my kids' quilts are their hand written labels. (I usually have them include their age, we'll have to add in "age 6" after his name.) I like that it shows his cursive writing. Once the quilt was back he commented that he wished he had written the whole label in cursive. He's also decided he'd like to rename the quilt. I'm not sure if that's really happening. Note that since I like to attach a label before quilting, sometimes the finish date is a little off due to my optimism on how quickly I'll get it bound. ;-)

Here's the full view of this cheerful 67" x 85" quilt.

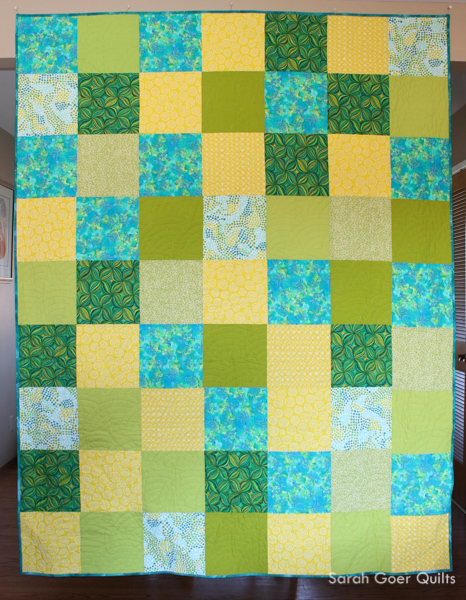
My daughter is now happily sleeping under it in her ocean room. My son has decided since he's made himself a quilt, two for his sister (including this one), and one for his dad, it is now time to make me a quilt. We discussed his plans at our one-on-one dinner this week and he would like it to be purple and grey, twin-sized so it's large enough for me to cuddle up with, and he'd like glow in the dark purple paint on it. I'm intrigued by his vision and look forward to seeing what he creates next.

I'm liking up to Needle and Thread Thursday, TGIFF and Finish It Up Friday. I'm also linking up to the Q4 Finishes Link-Up. See my Q4 list here.


My blog's third anniversary is later this month. To celebrate, I'm making some changes to the blog, including the addition of a twice monthly newsletter! Click below to stay in touch and receive color and design inspiration direct to your inbox!


24 Comments

My friend Wendy was hosting the Disney Mug Rug Swap on Instagram and I just couldn't resist joining in. Easy peasy: Buy a mug, make a mug rug, include one extra. My partner listed a variety of Disney interests and I dialed in on Finding Dory, especially after I found this adorable mug.

I immediately visualized an improv pieced ocean for Dory (and friends?) and eventually decided on purchasing a little bit of yardage of Finding Dory fabric by Camelot from Fat Quarter Shop. I started by shopping my stash for an ocean fabric pull.

Then I went for it with my first improv curved piecing. It all went together pretty well. The batik (second from top in the finished piece) was a little tricky, since it doesn't have as much stretch to it. I simply overlapped the fabrics I was piecing and freehand rotary cut a curve through both at the same time, then I eased them together with a 1/4" seam allowance as I machine pieced them together.

Generally I press my seams open when piecing, but this is one of those times that pressing open didn't make sense. I pressed to the blue on my first seam, so I just continued pressing up on all my seams. Here's the finished piece, front and back, before I trimmed it down.

At this point it was more placemat sized than mug rug sized, so I had to trim it down. I decided on vertical so I could arrange my characters in a way that they mug wouldn't cover them up. I trimmed down to just over 8" x 11".

My next step was to add the characters. I used fusible web to attach Dory, Nemo and Hank, then stitched around the edge of each.

Then I went to town quilting. I used my walking foot and quilted smooth curves to complement my piecing using a variety of blue threads (all 50 wt. Aurifil).

I was able to find a piece of remnant binding (from Finally) that was large enough to avoid a scrappy binding and worked with my color palette. I think this quilt would have been lovely with a faced binding, but I just didn't have the time to learn a new skill at this stage of the process. :-)

I opted to back the quilt with the licensed fabric, but I placed it in the horizontal direction. I liked the repeat better that way, and this gives Lisa options for a vertical or horizontal mug rug.

For my extra, I opted to make a large Open Wide Zippered Pouch (free tutorial by Noodlehead). (Shown in first picture.)


Lisa and I happened to be assigned each other for the swap. Here's the super generous package she sent me. She chose a nifty mug that has an electric mug warmer to go with it and made me a bag and a keychain. Plus she decorated the tote box and sent a Mickey Mouse raglan t-shirt pattern plus a bunch of other little goodies. So sweet of her!


Thanks for visiting! I'm linking up to TGIFF, Finish it Up Friday, and Needle and Thread Thursday.

Linking up to the Q4 Finishes Link-Up. See my Q4 list here.

8 Comments

After finishing her first quilt, Rainbow Swift 2, my daughter decided that she would make a doll quilt as a gift for a friend. I think she was inspired by the fact that my son's second quilt, Rainbow Swift, was a doll quilt that he made to her.

While on our family vacations to Portland and Southern California this summer, she chose some fabric to start her own stash. For this project, she picked solely from her stash. Her first choice was to use the cat fabric for the backing. Then she chose the "stripes" of fabric for the front of her quilt.

She opted for simple lines of quilting (similar to her brother's quilting on Rainbow Swift, but going perpendicular to the stripes of fabric) and wanted to add the quilting of her handprint like we did on her first quilt. I traced her hand and free motion quilted that part.

She hand wrote her label. (First name removed in pic.)

I keep remnant binding pieces to use on small projects and for scrappy bindings. She initially chose two pieces of binding from my remnants, but when I was making additional purple binding for my own project I offered to make enough extra purple so hers would be all one fabric and she liked that option. Last weekend we were finally able to finish up the quilt by attaching the binding. Now to deliver it to Ellie!

Thank you for visiting!

Linking up to the Q4 Finishes Link-Up. See my Q4 list here.