Tag Archives: Aurifil thread

4 Comments

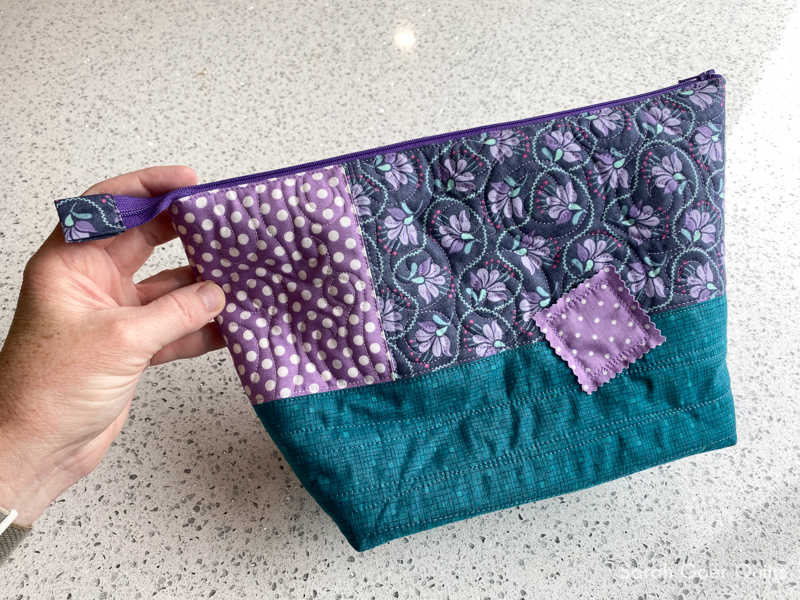
Today was our holiday part at Bay Area Modern Quilting. There's an annual tradition of a gift swap among members. In 2017, I made this apron for Gerre. And last year I made a pair of fabric trays for Joelle. This year I was assigned to make for Mary, and she indicated that her favorite colors were purple and teal and that she'd like "anything." I knew immediately that it would be fun to create something for her and decided her "anything" would be a bag, making it a twofer as it fits the requirements for the November Travel Handmade Bag Making challenge for the Aurifil Artisans.

I started with a fabric pull, including a zipper that coordinated. I spent a fair amount of time pursuing bag patterns and considering what I'd make. In the end, I settled on the Noodlehead Open Wide Zippered Pouch in size large. There are quite a variety of zipper pouch tutorials out there, but I just love this one so much! It's a great pattern, can be made with just one or two exterior fabrics, or tricked out with piecing or appliqué. Unlimited options!

I like making this size bag with fusible fleece on the exterior panels, but I didn't want to make a run to the store. Instead, I used a remnant of Quilters Dream Deluxe batting from this quilt. This thicker loft batting gave the bag great structure. Since I was quilting with batting, I made my panels a little oversized and trimmed down to size after quilting.

I had considered piecing the exterior panels, but decided on a split panel with the floral on the top and the teal Christa Watson fabric on the bottom. However, the floral was just a couple inches too narrow for this so I was able to use the polka dot to fill in. I ended up trimming off the floral size to leave a better ratio of the polka dots instead of just 1-2" per panel.

One my exterior panels were pieced I auditioned thread colors for quilting. I like having a variety to choose from.

I settled on these three: Light Lilac (#2510), Violet (#2520), and Dark Turquoise (#4182). I love that quilting with 50wt doesn't compete with the pattern on the fabric.

I chose three different motifs for the quilting. Here's a view from the back.

I used my walking foot for the organic, wavy lines in the teal sections, tried out a new-to-me motif from Leah Day's 365 FMQ Designs in the polka dot sections, and used one of my favorite motifs, spirals, for the floral sections.  I didn't have backing fabric on my quilt "sandwich" since the lining would cover the back of this quilted panel.

After quilting, I appliquéd the square of polka dot fabric to the front panel.

Then I chose a lining fabric, stitched it all together, added the tab of fabric on the end of the zipper.

The gift exchange is so fun every December. People made a variety of delightful gifts -- coasters, table runners, aprons, placemats, bags! Tomorrow I'll show you what I received. :-)

I'm participating in the 31 Day Blog Writing Challenge with Cheryl of muppin.com.

10 Comments

Hello and welcome to my stop for TGIFF! I look forward to seeing what you’ve finished this week. Be sure to link up your finish below.

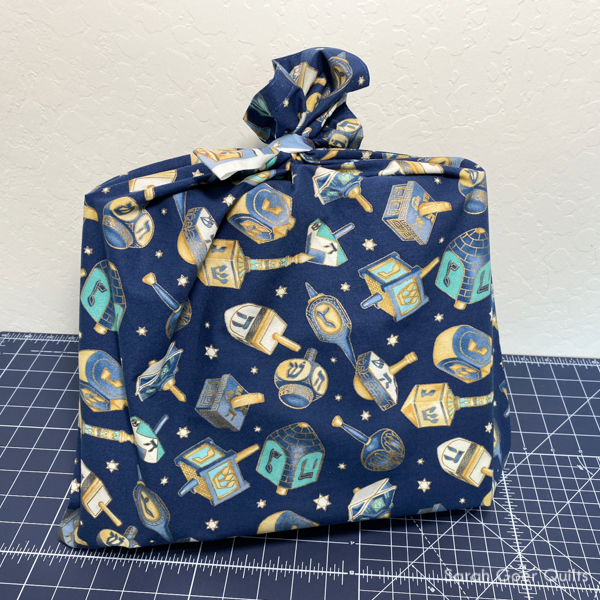
I opted for a super fast finish to share with you. Keep reading for all the tips on my process for making this pillowcase style gift bag.

I was recently given four Hanukkah fabrics (thank you Erin!) which I’m excited to have for making reusable gift bags. For years we’ve been using and reusing three Hanukkah gift bags. This works great since we give three gifts each night in our household. (Two kids, and my husband and I alternate gifts each night.) However, my kids have expressed a preference for having all eight of their gifts wrapped by the first night so that they can choose from the pile each night.  So… I’ll be working toward having at least 17 reusable bags (which won’t happen this year).

The beauty of this technique is that you can do it with almost any size piece of fabric. Today’s bag was made from a half yard of fabric. I began by folding the fabric in half, wrong sides together with selvages touching. I pressed to crease the fold. Then I trimmed both cut edges to square up the fabric and trimmed off the selvage edges. This left me with a folded rectangle that measured approximately 20” x 17”.

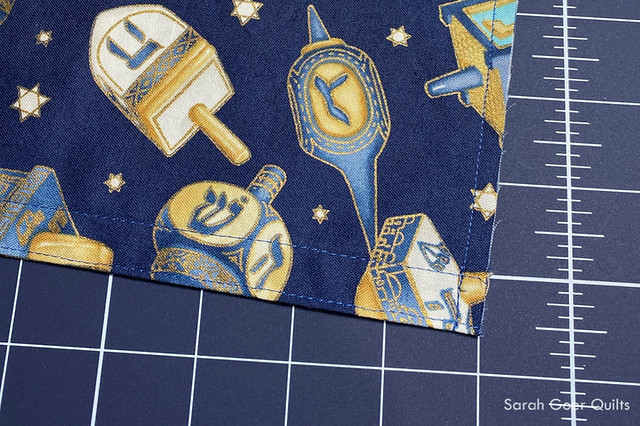
After trimming I sewed a hem on each edge where I trimmed off selvage.  (An alternative, and even faster option, would be to leave the selvage on and skip hemming.) My hem was made by folding 1/4”, pressing, then folding a second time and pressing again. My second fold was about 5/8” from the first fold, but as long as it’s a little bigger than 1/4” it’ll work. Once pressed, I stitched with a 3.5 stitch length approximately 1/8” from each fold. I do this with the wrong side of the fabric facing up so I’m sure to not miss the edge of the hem. I used Aurifil 50wt Medium Blue (#2735).


With wrong sides together, I stitched each side seam using a ¼” seam allowance, backstitching at the beginning and end. Then I trimmed that seam allowance down to 1/8”.


Next, I turned it inside out. I worked the corners out using a chopstick and pressed the seam to help avoid the fabric slipping while I sew. Then I sewed the two seams again, this time with right sides together. This step envelops the raw edges in the seam. Tada! French seam! If you find that you aren’t catching the raw edges in your seam, try stitching 3/8” from the edge in this step.


Flip right side out. Press the seams. Add a closure (hook and loop tape or a ribbon) if desired. (We usually just fold over the edge, but I’ve been known to tie closed with a strip of selvage, as shown. A chip clip works, too!)


Happy Holidays!


Please share your Friday Finish in the linkup below and be sure to hop around to view what everyone else has been up to this week! Share a link to this page so your readers can find the list and explore. Thanks for visiting!!

You are invited to the Inlinkz link party!

Click here to enter